So a few people have asked about my screentones and so I thought I’d do a step for step post on my process! I’ll be attaching a working .clip file below for you to see my settings, along with a time lapse, links to all the brushes I use (free on the clip studio assets page), and a video walkthrough if you’d prefer that option!
Like all art lessons this tutorial is about giving you the understanding of how some techniques and settings work so that you can apply them to your own art style. Don’t worry about recreating these steps every single time on every single piece. Instead focus on understanding on how these different steps work together so that way you can apply them as you want to your own art! Now let’s get started!
First things first lets look at our art and settings! This cavas is at 4.2” x 6.5” and we’re working at 600 dpi. The reason we’re working at such a high dpi is that it’s often the standard dpi used in professional printing, so we want our practice work to have similar settings to our pro work so we always know what our settings and brushes will feel like at that level.
I’m currently working a 2017 12” iPad Pro, and while it’s definitely starting to feel it’s age it runs 600 fairly smoothly! But adjust your DPI as needed, the lessons below will still be completely applicable!

1. The quickest way to start the screentone process is to make a selection with the Magic Wand Tool or the Lasso Tool! Personally I suggest using the Magic Wand tool with the settings seen below since they can make the process just a bit faster.
Here’s a breakdown on what the different settings mean on the Magic Wand Tool and why they matter:
Apply to connected pixels only - this option will only select matching pixels/colors that are touching. When it’s unselected it will grab every pixel that matches. The reason we want this turned on is so we don’t end up selecting our background or anything that’s not going to use our current screentone.
Close Gap - when selected this will allow you make selections in areas that have an open end. Really useful when you don’t want to connect every one of your lines in your inks!
Tolerance - allows a certain amount of color deviation from the pixels/color selected. I keep it on but fairly low just in case an inked line has some level of opacity
Refer Multiple - have this checked off and having the first option selected allows us to make selections from all present layers without have to adjust what layer we currently have selected! This along with Connected Pixels Only allows us to stay in the lines and not select every available pixel on our canvas
Anti- aliasing - when this turned off this creates a crisp hard edge on your selection. Having this turned on creates a soft selection, which will leave left over pixels if you do any transforming/moving. I high suggest almost always keeping this turned off
2. After making our selection we should have the Selection Launcher appear, we will then press on the small square made up of dots towards the end. (circled in red below)
If you do not have the selection launcher visible go to View and then make sure Selection Launcher has a checkmark next to it. Click it if it does not.

3. After pressing the button we will have the Simple Tone Settings window appear. This is where we adjust the settings of our screen tones to fit our needs! So let’s go over terminology since this section is one of the more important steps in the process.
Frequency - This option changes both the SIZE and NUMBER of dots that will be present. The higher the number the more dots there will be and the smaller they will appear, while a lower number makes the dots larger and be fewer in number.
Density - this will only change the SIZE of the dots. The bigger the number the larger the dots will appear and less space between them, this gives the screentone a darker appearance.
Type - changes the shape of the pattern. Clip Studio comes with several great options and variations, though for our situation I suggest just sticking with the Circle option for now!
Angle - the direction that the pattern will go in. No need to change this to be honest unless you’re looking for a very specific look.
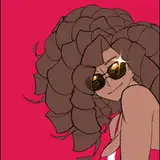
For this piece I chose a 55 frequency since they are just visible enough that we will see that it’s a screentone and not a grey color, and not so big that it will clash with the line art. With a 35% density to create a slightly darker color for this character’s skin tone. After you have your options decided go ahead and click that ok button!
Don’t worry too much about the options you select at this stage as there will be a easy way to make any changes a few steps from now.

4. After we select ok we will have a brand new screen tone layer set up for us automatically! Now from this stage we can really start to take advantage of the screen tone layer with our flatting/color blocking.
Every mark made on a screen tone layer will work as a screen tone no matter the settings or brush type! This will be the key ingredient to our rendering later so now is a great time to just play with a few brushes to see how they feel and work.
If you’re looking for a quick way to finish your blocking using the fill option for the Magic Wand or Lasso are great options, as well as my personal favorite the standard Clip Studio G-Pen with the anti-aliasing turned all the way off.
To add more layers with different options all you need to do is redo steps 1-3!

5. Once I put down a second layer I noticed that the tones were appearing a bit more tight than I originally had imagined. Luckily for us adjustments to our settings is quite easy and can be done on the fly!
All you have to do is select the Layers Property tab (circled below) and it will bring up a slightly more detailed version of our Simple Tone Window from step 3! But remember to always keep your frequencies the same among all your screen tone layers! This will help them blend seamlessly together if there’s any overlap and can be used for additional shading during our rendering stage!

6. From here we can can seamlessly change any of our settings! All we have to do is click the arrows and select from any of the preset options! Or if we want something a bit more specific we can just click the number and manually type in an option as well! Great if we want especially larger dots for more graphic options!
The edit I decided to go with is changing the frequency from 55 to 50, since I just wanted my dots to be a bit more visible when zoomed out. Often times when it come to edits a small nudge is better than big sweeping changes.

7. Now that I’ve got three separate layers each kinda operating as a Light, Middle, and Dark Tone I’ll go through and erase any parts that I don’t want any tones on. This is usually anything that I want to remain white or if I have heavy inks. The reason being that if we start adding tones to spots that are mostly dark already it will sort of blur together and not really add any more to the piece. With screen tones sometimes less is more.

8. Now we can begin the real secret weapon to rendering with screen tones: The clear palette! Right under your color palettes is a small rectangle with the transparent squares in it (circled below). This option allows us to use any brush we have selected to work as an eraser, keeping all opacity and textures with it.
The reason we render this way has to do with how screen tones are traditionally used. They come in a semi transparent sheet that you place on top of your line art, cut out with an exacto knife, and then scratch away actual screen tone sheet to add texture or high lights. So by using the clear palette we’re recreating that same scratching away process that we’d do traditionally.
We however have the bonus ability to back to selecting a color and adding the screen tone back! By switching between these two we can make unique textures that we normally wouldn’t be able to do otherwise!
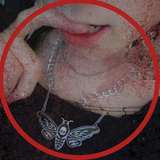
Below is an example of me using my Dry Brush and Red Juice brush to create highlight on the jacket. Then using the airbrush tool to create a soft high light on her chest! Really lean into your different brushes and see how they operate. I’ll provide all my brushes below so you can experiment with them as well!


9. After I’ve done all my screen tones I will go in and add a special white/highlights layer above my line art layers. This is mostly done for any small touches that I want to add, like adding shines to eyes or special textures like metal. Something that will go over several layers and is easier to add to one layer than try to scratch away at multiple different layers.

10. You’ve done it! These are all the steps to setting up and following through on screen tones. Now it’s just about experimenting with different settings to see which ones you like the most with your art and how your brushes feel with the limitations.
Don’t worry about creating a wildly detailed piece with a huge amount of screen tone layers. Just focus on a small piece with one layer and how it works best with your art style. Experiment and have fun with it. Once you’ve got that done start playing around with how two layers interact and overlap each other. How with the same frequency you can blend layers to get different shadows and light!

Thank you so much for your support and I hope this helps explain how to get to using screen tones! If you have any questions feel free to ask in the comments and I’ll do my best to give answers!
Brushes:
Red Juice: https://assets.clip-studio.com/en-us/detail?id=1702962
Inking/Hard lines: https://assets.clip-studio.com/en-us/detail?id=1775798
Coloring/opacity: https://assets.clip-studio.com/en-us/detail?id=1745701
Dry Brush: I couldn’t find the source for this one so I’ve attached it below
Video Version: https://youtu.be/SHW5U_OjRjE